Copyright (c) Hyperion Entertainment and contributors.
AmigaOS Manual: Workbench Fonts: Difference between revisions
| (One intermediate revision by the same user not shown) | |||
| Line 136: | Line 136: | ||
Figure 8-3 illustrates the Intellifont window. |
Figure 8-3 illustrates the Intellifont window. |
||
[[File:WorkbenchFig8-3.png|frame| |
[[File:WorkbenchFig8-3.png|frame|none|Intellifont Window]] |
||
{{Note|On-line Help is available in Intellifont at all times by pressing the Help key. Click on the various items in the Intellifont window for an explanation of their function. Press Esc to exit Intellifont Help.}} |
{{Note|On-line Help is available in Intellifont at all times by pressing the Help key. Click on the various items in the Intellifont window for an explanation of their function. Press Esc to exit Intellifont Help.}} |
||
| Line 153: | Line 153: | ||
using the Modify Existing Typefaces window, you can create or remove point sizes and bitmap images for a typeface. The window, illustrated in Figure 8-4, lists the typefaces and sizes available in the drawer you selected on the Intellifont window. |
using the Modify Existing Typefaces window, you can create or remove point sizes and bitmap images for a typeface. The window, illustrated in Figure 8-4, lists the typefaces and sizes available in the drawer you selected on the Intellifont window. |
||
[[File:WorkbenchFig8-4.png|frame| |
[[File:WorkbenchFig8-4.png|frame|none|Modify Existing Typefaces Window]] |
||
Click on the typeface you want to modify. Use the gadget in the lower half of the screen to: |
Click on the typeface you want to modify. Use the gadget in the lower half of the screen to: |
||
Latest revision as of 15:06, 31 January 2021
A font or typeface is a graphic design applied to all numbers, alphabetic characters, and symbols. Using fonts, you can change the appearance of the text on your screen or on your printed documents. Because fonts can have attributes applied to them, such as italic or bold, you can use fonts to add emphasis to your text or create a particular impression in your documents: informal, scholastic, journalistic, and so forth. This chapter describes using fonts on the Amiga, including:
- Types of fonts
- Fonts
- Font requesters
- Font Preferences editor
- FixFonts
- Intellifont
Types of Fonts
Two types of fonts are available on the Amiga: bitmap and outline. Bitmap fonts are defined as a pattern of dots that compose a character. Bitmap font files are stored on disk for each size. Outline font character shapes are defined mathematically and are generated to whatever size or resolution is needed.
Topaz, the Amiga's default font, is a bitmap font stored in ROM. Other bitmap fonts, such as Helvetica, Courier, and Times are included on your Amiga disks. You can, however, create or purchase additional bitmap and outline fonts.
When choosing a font, you also specify a size in pixels, which describes the height of a character. After you have selected a font, the available sizes for it are displayed in a scroll box in a font requester. Higher numbers represent larger fonts. The maximum size allowable is 124 points.
You can use available font sizes or enter a new size. The Amiga can scale both bitmap and outline fonts to a specified size. However, scaled bitmap fonts often appear distorted.
Using Bitmap Fonts
Although bitmap fonts produce acceptable screen displays, their resolution is usually too low for high quality printouts.
Bitmap scaling stretches or squeezes the bitmap pattern, causing scaled bitmap fonts to appear distorted. If you enter a size that is not listed for a bitmap font, try to double an available size or cut an available size in half to preserve the font's proportions. For example, to produce a font between an 18 and 24 point Helvetica, use 22 since it is twice the height of the existing 11 point font. Fonts can also be scaled with the Fonts Preferences editor described on page 8-5.
Some application programs include their own fonts, font management utilities, or font scaling technology. These may use the Amiga's fonts and font technology. Read the application's manual carefully to learn how to produce the fonts you need.
Using Outline Fonts
Outline fonts are available on Amiga systems with Release 2 and higher system software. The Amiga uses Agfa Compugraphic Intellifont® technology that is managed through the Intellifont utility, described in this chapter. Compugraphic fonts for MS-DOS computers can be purchased and used on the Amiga.
Because of their large size and memory requirements, outline fonts are best suited to expanded systems equipped with hard disks. You can use them with floppy disk systems, but you may need to delete items from the Workbench backup disk to make room for them.
Outline fonts can be printed at the highest resolution of your printer, typically better than screen resolution. Outline fonts do not have separate files for each point size; instead, outline fonts are mathematically generated as required. As a result it can take longer on the first try to access an outline font than a bitmap font.
Using Proportional and Non-proportional Fonts
Both bitmap and outline fonts can be proportional or non-proportional. Proportional fonts are those in which each character occupies only the amount of space it actually needs. For example, a w character uses more space than an i character. These fonts are used to display normal text. Non-proportional fonts, also called monospaced fonts, are those in which each character occupies the same amount of horizontal space. Such fonts are easier to handle when creating numeric tables.
Fonts
On the Amiga, fonts are stored in FONTS, which can be a drawer or disk. On a hard drive system, the FONTS: directory is typically on the SYS: partition. For floppy-only systems, fonts are contained on your Fonts disk or in a Fonts drawer on your system floppy disk set. For those familiar with AmigaDOS, you can use the ASSIGN command to add disks or drawers to the FONTS: search path.
For every font you find in FONTS:, there is a file named fontname.font. For bitmap fonts there is also a subdirectory named fontname in which the file names are numbers corresponding to the font size this file contains. For outline fonts, each has a second file named fontname.otag and a file in the subdirectory _bullets_outlines named fontname.type.
Font Requester
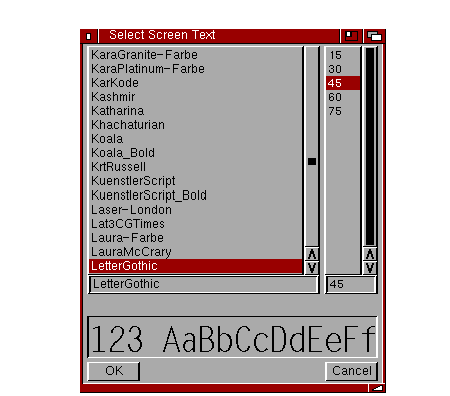
A Font requester, shown Figure 8-1, allows you to change your font and font sizes. The standard Amiga font requester is used by the Font Preferences editor and by some applications.

The Amiga font requester window displays the available fonts and corresponding point sizes in adjacent scroll boxes. The name of the selected front and current point size are displayed in gadgets beneath the scroll boxes.
Underneath the text gadgets, a display box shows a sample of the selected font and its size. Tall fonts may not fit within the box. Drag the font requester's sizing gadget to the right to show more of the characters in the font.
Selecting a new font name in the requester does not change the current font size. If the newly selected font does not exist in the current size, it is scaled to that size. Remember that bitmap fonts can appear rough or distorted when scaled. For better quality, select one on the font's existing sizes. If the new font is an outline font, there is a delay while the new font is generated.
The Amiga font requester has a Control menu with six items:
| Last Font | Moves through the displayed font list backwards. |
| Next Font | Moves through the displayed font list forwards. |
| Restore | Recalls the font and size selected when the requester opened. |
| Rescan Disk | Looks through the FONTS: search path for newly added fonts. |
| OK | Uses the displayed font. The same as using the corresponding gadget. |
| Cancel | Restores the original setting. The same as using the corresponding gadget. |
The keyboard shortcuts for these menu items do not work when one of the text gadgets is selected.
Font Preferences Editor
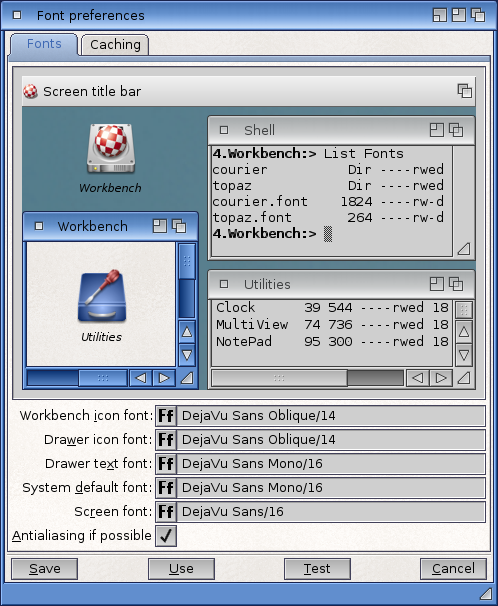
The Font Preferences editor, illustrated in Figure 8-2, allows you to choose the style and size of fonts that the Amiga uses for its user interface.
| Note |
|---|
| Many applications choose their own fonts and are not affected by your choices in the Font editor. |

Selected Fonts Field
The Selected Fonts display shows the current font settings for each type of next on your display.
Font Selection Gadgets
The three gadgets in the middle of the Font editor window allow you to select the type of text to be changed.
| Workbench Icon Text | Changes the font used below icons in the Workbench windows. This is the only text for which colors can be specified. |
| System Default Text | Changes the font that the Amiga uses to display information, such as the text in the Workbench Output Window and the View By Name mode. |
| Screen Text | Changes the font appearing in menus, title bars, and most requesters. |
You can only change the font for one type of text at a time. However, you can change the font for each type without exiting the Font editor.
Selecting Save or Use closes the Font editor; Save saves the changes across sessions and Use lets you use the changes for the current session only. Workbench automatically tries to reset to display the new font choices. You are requested to close any open project, tool, or Shell windows. Disk or drawer windows can remain open.
| Note |
|---|
| Changing the Workbench Icon Text font forces a cleanup of the icons in all open windows. Select the Update All menu item to recall the previous positions. |
Selecting the Cancel gadget closes the Font editor without making any changes.
Font Selection Requesters
The three font selection requesters display the available fonts and point sizes, as well as the current font for the selected type of text.
All fonts can be used for Workbench text or Screen text. However, the font used for the System default text must be a non-proportional font, such as Topaz or Courier. Non-proportional, or monospaced, font characters are all the same width.
Drag the scroll bar or use the scroll arrows to scroll through the names of the available fonts. Select a font by pointing to it and clicking the selection button. Then choose a size for the font by selecting one of the sizes listed or entering a new size.
The font requester for Workbench Icon Text lets you specify the color for the text or the text and field (character background) with the Mode cycle gadget:
- Selecting Text in the Mode gadget displays the text in the color specified by the Text color selection gadget; the field is transparent.
- Selecting Text and Field lets you specify an opaque color for the field. This option lets you ensure that text is legible, regardless of the background pattern.
- Change the color of the text or field by clicking in the color field next to the display button for both Text and Field. Be sure to select two different colors for the text and the field; if the text blends in with the field, the words will not be legible.
The number of available colors is determined by the current Workbench screen mode and the colors themselves are determined by the Palette editor. Workbench screen colors can only be changed within the Palette editor.
FixFonts
FixFonts is a utility for updating .font files after fonts have been added or deleted. Running FixFonts updates all the .font files to match the corresponding font drawers. Double-clicking on the FixFonts icon activates it without opening a window. A requester appears asking for the disk containing Fonts if it is not mounted and there are no assignments for fonts.
Intellifont
The Intellifont utility, which is in the System drawer on the Workbench disk, manages Intellifont outline fonts on your Amiga. Intellifont installs new outline fonts on your system, specifies new sizes for existing fonts, and deletes fonts that are not longer needed. Intellifont also allows you to create bitmap versions of any size outline font that can be used in applications that do not support outline fonts directly. These fonts load faster since they are not computed every time they are used.
Intellifont can use Agfa Compugraphic fonts from MS-DOS FAIS disks, as well as font disks for the Amiga. Since standard Compugraphic FAIS disks are in MS-DOS format, CrossDOS, an Amiga Bridgeboard, or other MS-DOS emulator must be used to convert the files to AmigaDOS format. When the fonts are properly installed, they are available to any application programs that can use them.
Installing Outline Fonts
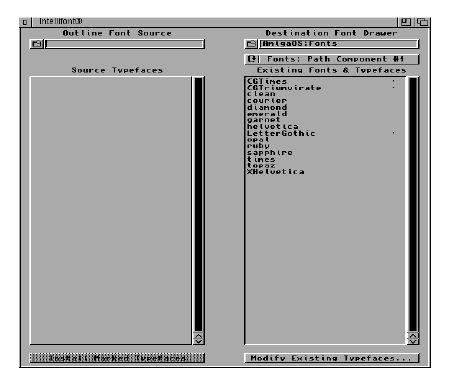
Figure 8-3 illustrates the Intellifont window.

| Note |
|---|
| On-line Help is available in Intellifont at all times by pressing the Help key. Click on the various items in the Intellifont window for an explanation of their function. Press Esc to exit Intellifont Help. |
To install an outline font:
- Enter the complete path to the fonts you want to install in the Outline Font Source text gadget or select the file folder gadget next to it to open a file requester. The path should end with the directory that contains the outline typeface .type files.
- Select OK and the Source Typefaces scroll gadget displays the available outline fonts in that directory.
- Verify that you want to install the fonts in the drawer displayed in the Destination Font Drawer text gadget. If you have more than one font directory set up in your FONTS: assign path, use the Fonts: Path Component cycle gadget to switch between them. A non-assigned directory can also be entered. (In this case, the cycle gadget displays Not in Fonts: Path.) The contents of the Destination Font Drawer are shown in the Existing Fonts and Typefaces scroll gadget. Outline fonts are indicated with a small bullet (o) on the right in the scroll window.
- In the Source Typefaces display, click on each typeface to be installed. A plus sign (+) indicates selection.
- Select the Install Marked Typefaces gadget to copy the typefaces to the Destination Font Drawer.
- Select the Modify Existing Typefaces gadget to add or delete point sizes for any of the outline fonts listed in the source typeface display.
Modifying Outline Fonts
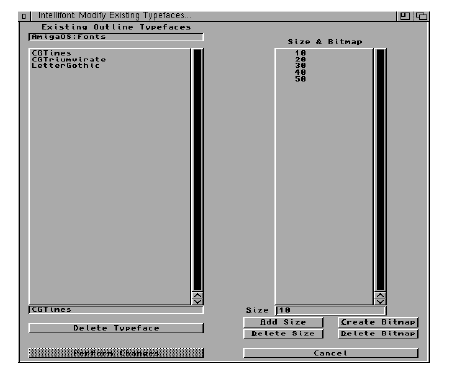
using the Modify Existing Typefaces window, you can create or remove point sizes and bitmap images for a typeface. The window, illustrated in Figure 8-4, lists the typefaces and sizes available in the drawer you selected on the Intellifont window.

Click on the typeface you want to modify. Use the gadget in the lower half of the screen to:
| Delete Typeface | Select one of the Existing Outline Typefaces. The selected typeface moves to the display box. Click on the Delete Typeface gadget. |
| Add Size | Enter a new size into the Size display box and choose the Add Size gadget. |
| Delete Size | Select a size or enter one into the Size display box and choose the Delete Size gadget. |
| Create Bitmap | Creates a bitmap font based on the selected outline typeface and size. If you routinely use one size, create a bitmap for it. Note that this can use a large amount of disk space. |
| Delete Bitmap | Deletes the bitmap file for the size displayed. The size is still available as an outline font. |
| Perform Changes | Saves your changes. |
| Cancel | Returns to the original Intellifont window. |
The Close gadget closes the Intellifont windows and exits the program.
Keyboard shortcut: Instead of selecting the gadgets previously described, press the initial letter of the gadget (underlined on the display).
Changing Environment Variables
Intellifont can use two environment variables to store specifications about your outline fonts: Intellifont and Diskfont. The Intellifont environment variable is used to create the list of sizes that are typically presented by applications in their font menus. The default sizes are 15, 30, 45, 60, and 75. Create the Intellifont variable if you frequently use other sizes. Use a text editor to create a file containing a list of sizes saved in ASCII format; the maximum number of sizes is 20. Save the file to SYS:Prefs/Env-Archive/Sys/Intellifont.
The Diskfont variable specifies the parameters used by the diskfont.library when it converts an outline typeface into an Amiga graphics font. The format of the variable is:
XDPI/N, YDPI/N, XDOTP/N, YDOTP/N
The XDPI and YDPI parameters adjust the aspect ratio, which by default is 1:1. If the fonts are to be used in the High Res display mode, adjust the aspect ratio by changing the XDPI value to 100 and the YDPI value to 50. Use a text editor to change the values and save the file to SYS:Prefs/Env-Archive/Sys/Diskfont. For example:
XDPI 100 YDPI 50
If XDPI is specified, YDPI must also be specified.
The XDOTP and YDOTP parameters control the dot size percentage (the space a dot fills in relation to the screen resolution). The default value for both XDOTP and YDOTP is 100 (a dot fills the same size as implied by the resolution) and should not need changing. If XDOTP is specified, YDOTP must also be specified.
| Note |
|---|
| Very large or very small values of XDOTP or YDOTP are required before you can see a difference. |