Copyright (c) Hyperion Entertainment and contributors.
AmigaOS Manual: Workbench Using: Difference between revisions
Steven Solie (talk | contribs) |
Steven Solie (talk | contribs) |
||
| Line 257: | Line 257: | ||
To save any changes made to the Information window, select the Save gadget in the lower left corner. |
To save any changes made to the Information window, select the Save gadget in the lower left corner. |
||
==== Snapshot ==== |
|||
Snapshot saves the positions of all the currently selected icons. The next time you open the window, the icons that you selected appear in their saved positions. You can save the positions of several icons at one time by using drag selection or extended selection. |
|||
To save the position of an icon: |
|||
# Select the icon. |
|||
# Choose Snapshot. |
|||
==== UnSnapshot ==== |
|||
UnSnapshot cancels the snapshot position of an icon. The next time you open the window, the icons are rearranged. |
|||
To release the snapshot position of an icon: |
|||
# Select the icon. |
|||
# Choose UnSnapshot. |
|||
==== Leave Out ==== |
|||
Leave Out moves an often-used icon out of its original window and into the Workbench window for faster access. The file represented by the icon remains in its original drawer on the disk; only the icon is moved. The icon remains in the Workbench window, even if the machine is rebooted. This menu item cannot be used with disks or the Trashcan. |
|||
To use Leave Out: |
|||
# Select the icon. |
|||
# Choose Leave Out. |
|||
The icon moves into the Workbench window. |
|||
==== Put Away ==== |
|||
Put Away returns an icon that was left out to its original drawer. |
|||
To use Put Away: |
|||
# Select the icon. |
|||
# Choose Put Away. |
|||
==== Delete ==== |
|||
Delete erases files and their icons from your disks. |
|||
{{Note|title=Caution|text=Use Delete with caution; you cannot retrieve something that was deleted.}} |
|||
To delete a file or drawer: |
|||
# Select its icon. Use drag selection or extended selection to choose more than one icon to be deleted. Disks and the Trashcan cannot be removed with Delete. |
|||
# Choose Delete from the Icons menu. A warning requester appears, listing the number of files and drawers currently selected. Verify that you want to erase permanently the items listed. Remember that if you delete a drawer, everything contained in it is also deleted. |
|||
# Select the OK gadget. The icon and the files associated with it are erased from your disk. If you do not want to delete everything currently selected, select the Cancel gadget. |
|||
==== Format Disk ==== |
|||
Formatting a disk prepares it for storing information. Format disks that are new and unformatted, disks that develop errors, or disks on which you wish to use different file system options. |
|||
{{Note|title=Caution|text=Formatting erases all information on a disk. Be careful not to format disks that hold information that you do not want to lose, particularly your original system and software applications disks.}} |
|||
Select the icon of the disk to be formatted and choose Format Disk from the Icons menu. The Format window, illustrated in Figure 4-5, displays the current information about the disk. If the disk is already formatted, its volume name and the percentage of the disk currently in use are displayed. A text gadget allows you to enter a new Volume name for the disk. |
|||
[[File:WorkbenchFig4-5.png|frame|center|Format Window]] |
|||
Four items can be selected (checked) in the Format window: |
|||
{| class="wikitable" |
|||
| Put Trashcan || Allows you to put a Trashcan on the disk. |
|||
|- |
|||
| Fast File System || Allows the Amiga to fit more information on a disk. It is faster than the standard file system. Fast File System disks are incompatible with Workbench software releases prior to 2.0 and should not be selected for disks that are also used on pre-Release 2 Amigas. |
|||
|- |
|||
| International Mode || Fully supports international characters in file names. We recommend that you set this option on.<br/>International Mode is incompatible with Workbench software releases prior to 2.0 and should not be selected for disks that are also used on pre-Release 2 Amigas. |
|||
|- |
|||
| Directory Cache || Speeds up the opening of drawers, file requesters, and listings. This option is off by default. Disks using Directory Cache are incompatible with Workbench software releases prior to 3.0 and should not be selected for disks that are also used on pre-Release 3 Amigas. |
|||
|} |
|||
Fast File System, International Mode, and Directory Cache can only be specified for AmigaDOS disks. Selecting the Directory Cache option automatically selects International Mode. Disks created with the Directory Cache option can only be read by Amigas running Workbench Release 3.0 and above. |
|||
Quick format is for reformatting a disk that was previously formatted. You cannot format a new blank disk with Quick Format. Choosing the Quick Format option is faster than formatting the entire disk; however, it does not detect any read/write errors on the disk that could be eliminated by a full format. |
|||
When the disk is formatted, if you did not change he name in the Format window, it is labeled Empty. This name can be changed using the Rename item in the Icons menu. |
|||
==== Formatting Hard Disks ==== |
|||
You must format your hard disk under the following conditions if: |
|||
* It is a new unformatted disk. |
|||
* You have a serious unrecoverable disk error. |
|||
* You have repartitioned the disk. |
|||
* You wish to use a different file system option on the disk, such as the Directory Cache option. |
|||
Before reformatting your hard disk, be sure to back up all important information from the disk. |
|||
The Ram Disk cannot be formatted. If you accidentally select the Ram Disk for formatting, a requester reports that there is a format failure and requires you to select Cancel. |
|||
If you have more than one disk icon selected, more than one Format window opens when the Format Disk item is selected from the Icons menu. The format windows open one on top of another so that only one Format window is initially visible. Drag the windows until all are visible. Be sure to check the Current Information field in the Format window for the intended Device and Volume names before allowing the format to continue. |
|||
{{Note|title=Caution|text=Check the device and volume names carefully. If you accidentally reformat your hard disk instead of a floppy, you will eras all of your files.}} |
|||
Revision as of 22:43, 3 February 2014
This chapter describes the Amiga Workbench, an icon-based environment that allows you to give instructions by manipulating graphic symbols with a mouse rather than by typing in commands at a keyboard. Included in this chapter are descriptions of the following:
- The Workbench Screen
- The Workbench Window
- The Workbench Menus
- Workbench Programs
Workbench Screen
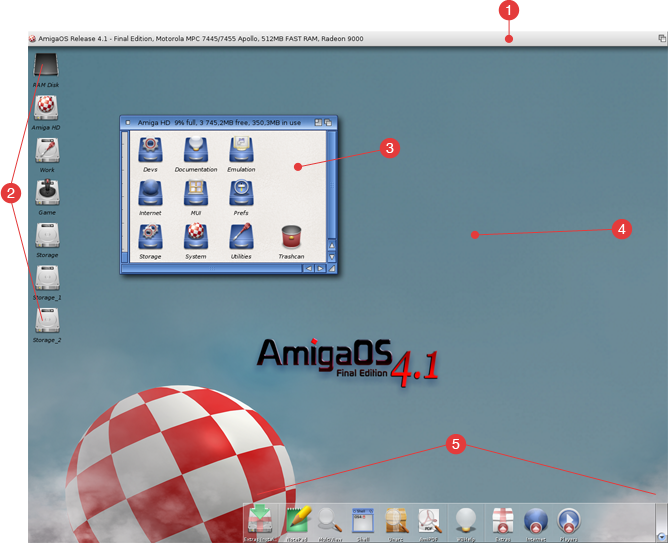
The Workbench screen, illustrated in Figure 4-1, is the primary visual component of your system. Icons and other windows appear on it.
The Workbench screen is identified by the Amiga Workbench title bar located along the top border of the display. The Workbench screen's title bar also displays the number of bytes of graphics (Chip) memory and other (Fast) memory currently available when any window, except a Shell window is selected.
The Amiga provides Preferences editors (described in Chapter 5) that allow you to customize the Workbench screen. You can define an extra-large virtual Workbench screen that is larger than the viewable area with more space for windows.
Workbench Window
When you boot you Amiga, the Workbench window fills the Workbench screen. This window contains icons for any floppy disks inserted into floppy drives, the Ram Disk, and any other icons determined by your system's configuration.
Although the Workbench window appears and functions like an application window, it is an essential part of the Workbench screen.
Workbench Menus
The workbench has the following four menus:
| Workbench | Contains options for working with Workbench and windows opened on the Workbench screen. |
| Windows | Contains options for working within the currently selected window. |
| Icons | Contains options for working with the currently selected icon or group of icons. |
| Tools | Is available for applications to use or for user-created menu items. |
Workbench Menu
The Workbench menu contains general Workbench options and options for windows opened on the Workbench screen. You can, for example, use the Workbench menu to update the screen display or see which version of the system software is in use.
On the Workbench menu you can select the following options:
Backdrop
The Backdrop menu item creates more room on the Workbench screen for displaying windows and icons. Backdrop switches between a normal window for your Workbench and a special borderless window that is always behind other windows opened on the Workbench.
Choosing Backdrop removes the Workbench window borders so that the disk icons appear to be on the Workbench screen without being enclosed in a window. To return to the normal Workbench window, choose Backdrop again. Backdrop is reset to off if you power off or reboot your computer. To save your Backdrop selection choose the Snapshot item in the Windows menu while the Workbench window is selected.
Execute Command
| Note |
|---|
| This menu item is provided for users familiar with AmigaDOS. |
The Execute Command executes (starts) an AmigaDOS command without opening a Shell window. Figure 4-2 illustrates an Execute Command requester.
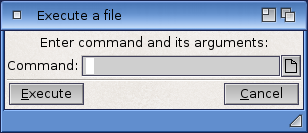
Enter the command and all of its arguments in the requester.
A Workbench Output Window is automatically opened when a command results in output and it remains there until you select its close gadget. The current directory for an Execute Command operation is RAM:.
Redraw All
Redraw All redraws all open Workbench windows in the Workbench screen and can be used in the event of a disturbance to the Workbench. If Redraw All does not restore the windows to their proper appearance, reboot the computer.
Update All
Update All reopens each open Workbench window, updating its appearance to show its current state.
| Note |
|---|
| If you have several windows open and have been using the Shell or an application to change to the contents of a disk, the changes may not be reflected in its windows until you close the windows and reopen them or choose Update All. |
Last Message
Last Message retrieves the last information or error message that appeared on the title bar.
About
About opens a requester showing the internal version number of the Workbench and Kickstart software, as well as copyright information. Select the OK gadget to close the requester.
Quit
Quit closes all Workbench operations, making additional RAM available if needed. The Workbench does not close if there are any programs running, including programs that do not open a window and programs that are in your WBStartup drawer.
The only windows that can remain open while using Quit are the disk, drawer, and Shell windows. Once you OK the Quit requester, a Shell window is your only link to the Amiga. You can use the Shell icon in the System drawer to open a Shell window before quitting the Workbench.
Return to the Workbench by typing LOADWB (load Workbench) at the Shell prompt and pressing Return. If there is no Shell window open, you must reboot to return to the Workbench.
The close gadget on the Workbench window is the same as choosing Quit.
Window Menu
The Window menu is only available when a Workbench window is selected. The Window menu allows you to create new drawers, select the contents of the window, rearrange the contents, change how the contents are displayed, and close the window. The available window options are:
New Drawer
To create a new drawer:
- Select the window in which you want to create the drawer.
- Choose New Drawer from the Window menu. The drawer is created and named "Unnamed1".
- A Rename requester prompts you to change the name of the drawer.
- Delete the existing name using the DEL key, enter a new name, and press Return or select OK. Selecting Cancel leaves the default name on the new drawer.
Open Parent
A window's parent is the window that contains its icon. With the exception of the Workbench window, every Workbench disk window has a parent window.
Open Parent opens the selected window's parent or brings it to the front of the display if it is already open.
Close
Close closes and removes the selected window from the screen.
Mouse shortcut: For many windows, you can select the close gadget in the upper left corner of the window.
Update
Update redraws the selected window, including any changes made to the contents through the Shell or the Execute Command menu item. Such changes are not reflected until the window is updated or reopened.
Select Contents
Select Contents selects all of the icons in the current window.
Clean Up
Clean Up automatically arranges all the icons in the selected window so that they do not overlap. This arrangement is not saved until you use the Snapshot menu item described below.
Snapshot
Snapshot saves the arrangement and position of icons in a window. It is commonly used following Clean Up. Snapshot has a submenu containing two items: Window and All.
Snapshot Window saves the position and size of the selected window, as well as the Show and View By settings described below. However, it does not save the position of the icons in the window.
Snapshot All saves the position and other settings of all the icons in the selected window, as well as the position and size of the window.
Show
Show controls the types of icons that are displayed on a window. Show has two submenu items: Only Icons and All Files.
Show Only Icons is the default Show mode, displaying only those files and drawers that have icons (.info files).
Show All Files provides a pseudo-icon for each file or drawer in the selected window that does not have a real icon. Pseudo-icons can be treated like any other icon, including manipulating them with the menu items in the Icon menu.
You may have to scroll in the window to see the new pseudo-icons.
View By
View By changes how the information in the window is displayed. View By has four submenu items: Icons, Name, Date, and Size.
View By Icons is the window's default mode.
Choosing View By Name, View By Date, or View By Size displays a window's contents in text form, including the size of the file, its attributes (whether it can be read, deleted, executed, or written to), and its timestamp.
File and drawer names can be selected, opened, dragged, and manipulated just like icons.
View By Name sorts the file list in alphabetical order.
View By Date sorts the list in chronological order, with the most recently created file listed first.
View By Size sorts the list by size, listing the smallest file first.
Icons Menu
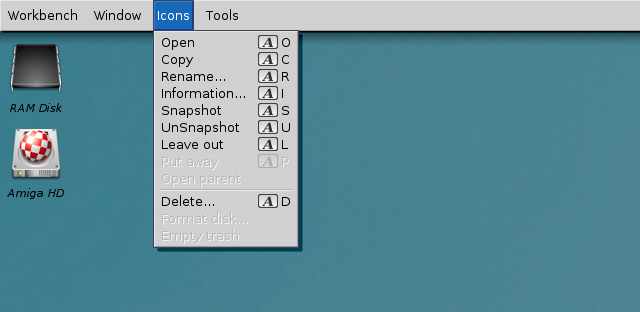
The Icons menu allows you to work with the icons on the screen. An icon must be selected before the menu options illustrated in Figure 4-3 become available.
Open
Opening an icon makes a program or window available.
When you open a disk or drawer icon, a window displays the icons contained on that disk or in that drawer. When an individual project or tool is opened, the corresponding program starts.
Open an icon by selecting it an choosing Open.
Mouse Shortcut: Point to the icon and double-click the selection button.
Copy
Copy allows you to duplicate disks, drawers, programs, or files within a window. To copy material to another window, use the drag-copy method described in Chapter 3. Drag-copying is the easiest method of copying a disk on a two-floppy-system.
Use Copy for making backup copies of your disks.
To copy a drawer, project, or icon:
- Select the icon.
- Choose Copy from the Icons menu.
Copying disks on single-floppy disk drive systems entails a process known as swapping. Source and destination disks are swapped in the single drive as the system first reads information from the source disk and the writes it to the destination disk. The destination disk must be write-enabled, but need not be formatted since Copy formats the disk as it writes to it. Be sure to copy to disks of the same density as the original disks.
To copy a disk on a single-floppy disk drive system:
- Insert the source disk into the Amiga's internal disk drive.
- Select the source disk's icon.
- Choose Copy from the Icons menu. Insert the Workbench disk, if necessary.
- If the disk copy requires at least five swaps, a requester tells you how many swaps are needed. Closing any unnecessary windows or stopping any unwanted programs helps reduce the number of swaps.
- Select the Continue gadget in the swap requester. During the disk copy, the icon for the disk being copied is unavailable and is labeled "BUSY".
- Insert the source disk into the drive when prompted and select Continue. A horizontal bar gauge shows the percentage of the disk copy completed.
- Insert the destination disk into the drive when prompted and select Continue to copy the information read in from the source disk. Swap the disks as often as requested. When the copy is finished, a Disk Copy Finished message appears.
- Remove the destination disk from the drive and label it. The destination disk's icon is labeled with a copy_of_prefix (for example, copy_of_DataDisk).
Rename
Rename changes the name of an icon. It is used to remove the copy_of_prefix from something you copied, as well as for changing the names of drawers, disks, and files.
To rename an icon:
- Select the icon.
- Choose Rename from the Icons menu. A requester containing a text gadget displays the current name of the icon.
- Delete the old name using Backspace or right Amiga+X and enter the new name. Do not use spaces before or after the new name. Because embedded spaces are not visible, they can cause confusion if you have to type in the icon name again.
- Press Return. The new name appears under the icon.
Information
Information displays status information about the selected icon's file. Certain data can also be modified in the Information window. Figure 4-4 illustrates the Information window.
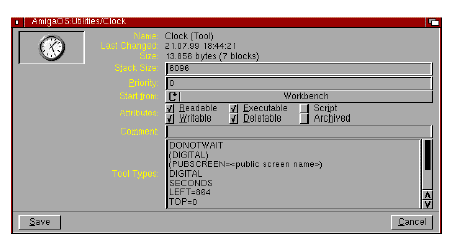
Although the contents of the window varies with the icon, the following information is always displayed:
| title bar | The window title bar indicates the path to the icon. |
| name | The icon name and its type in parentheses (Volume, Drawer, Tool, Project, or Trashcan). |
| image | A picture of the icon. |
| size | The number of blocks and bytes that the disk, project, or tool fills. |
| stack | The amount of memory reserved as temporary storage for a specific tool. |
| last changed date | The date on which the icon was created or the last time it was changed (its timestamp). |
For a disk icon, the window also shows whether a disk is write-enabled (Read/Write) or write-protected (Read Only).
For a drawer, trashcan, project, or tool, the following attributes can be set or cleared by clicking on the attribute's check box.
| Script | If set, the file is a script (a text file of AmigaDOS commands) and can be run without using the EXECUTE command. |
| Archived | This attribute is set by backup programs to indicate that a file or directory has been archived (backed up). It is cleared whenever the file is saved. |
| Readable | If set, information in the file can be read. If this attribute is clear, a tool will not run and a project cannot be loaded by its Default Tool. |
| Writable | If set, information can be written into the file. Unless Writable is set, you cannot make changes to the file. |
| Executable | If set, the file is a tool that can be run from Workbench or the Shell. If this attribute is clear, the tool cannot be run from the Shell. |
| Deletable | If set, the drawer, project, or tool can be erased from the disk. If clear, the object is protected from deletion. |
If the icon represents a project, there is a Default Tool gadget. This specifies the path to the tool that created the project. When the project icon is opened, the default toll is also opened to work on the project.
If there is a Comments box, you can add a note of up to 79 characters by selecting the text gadget next to Comments, entering the text, and pressing Return.
The Tool Types box specifies different startup options for some programs or files. Icon Tool Types are described in Chapter 3.
To save any changes made to the Information window, select the Save gadget in the lower left corner.
Snapshot
Snapshot saves the positions of all the currently selected icons. The next time you open the window, the icons that you selected appear in their saved positions. You can save the positions of several icons at one time by using drag selection or extended selection.
To save the position of an icon:
- Select the icon.
- Choose Snapshot.
UnSnapshot
UnSnapshot cancels the snapshot position of an icon. The next time you open the window, the icons are rearranged.
To release the snapshot position of an icon:
- Select the icon.
- Choose UnSnapshot.
Leave Out
Leave Out moves an often-used icon out of its original window and into the Workbench window for faster access. The file represented by the icon remains in its original drawer on the disk; only the icon is moved. The icon remains in the Workbench window, even if the machine is rebooted. This menu item cannot be used with disks or the Trashcan.
To use Leave Out:
- Select the icon.
- Choose Leave Out.
The icon moves into the Workbench window.
Put Away
Put Away returns an icon that was left out to its original drawer.
To use Put Away:
- Select the icon.
- Choose Put Away.
Delete
Delete erases files and their icons from your disks.
| Caution |
|---|
| Use Delete with caution; you cannot retrieve something that was deleted. |
To delete a file or drawer:
- Select its icon. Use drag selection or extended selection to choose more than one icon to be deleted. Disks and the Trashcan cannot be removed with Delete.
- Choose Delete from the Icons menu. A warning requester appears, listing the number of files and drawers currently selected. Verify that you want to erase permanently the items listed. Remember that if you delete a drawer, everything contained in it is also deleted.
- Select the OK gadget. The icon and the files associated with it are erased from your disk. If you do not want to delete everything currently selected, select the Cancel gadget.
Format Disk
Formatting a disk prepares it for storing information. Format disks that are new and unformatted, disks that develop errors, or disks on which you wish to use different file system options.
| Caution |
|---|
| Formatting erases all information on a disk. Be careful not to format disks that hold information that you do not want to lose, particularly your original system and software applications disks. |
Select the icon of the disk to be formatted and choose Format Disk from the Icons menu. The Format window, illustrated in Figure 4-5, displays the current information about the disk. If the disk is already formatted, its volume name and the percentage of the disk currently in use are displayed. A text gadget allows you to enter a new Volume name for the disk.
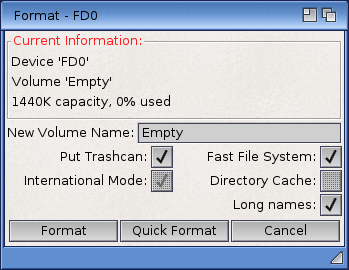
Four items can be selected (checked) in the Format window:
| Put Trashcan | Allows you to put a Trashcan on the disk. |
| Fast File System | Allows the Amiga to fit more information on a disk. It is faster than the standard file system. Fast File System disks are incompatible with Workbench software releases prior to 2.0 and should not be selected for disks that are also used on pre-Release 2 Amigas. |
| International Mode | Fully supports international characters in file names. We recommend that you set this option on. International Mode is incompatible with Workbench software releases prior to 2.0 and should not be selected for disks that are also used on pre-Release 2 Amigas. |
| Directory Cache | Speeds up the opening of drawers, file requesters, and listings. This option is off by default. Disks using Directory Cache are incompatible with Workbench software releases prior to 3.0 and should not be selected for disks that are also used on pre-Release 3 Amigas. |
Fast File System, International Mode, and Directory Cache can only be specified for AmigaDOS disks. Selecting the Directory Cache option automatically selects International Mode. Disks created with the Directory Cache option can only be read by Amigas running Workbench Release 3.0 and above.
Quick format is for reformatting a disk that was previously formatted. You cannot format a new blank disk with Quick Format. Choosing the Quick Format option is faster than formatting the entire disk; however, it does not detect any read/write errors on the disk that could be eliminated by a full format.
When the disk is formatted, if you did not change he name in the Format window, it is labeled Empty. This name can be changed using the Rename item in the Icons menu.
Formatting Hard Disks
You must format your hard disk under the following conditions if:
- It is a new unformatted disk.
- You have a serious unrecoverable disk error.
- You have repartitioned the disk.
- You wish to use a different file system option on the disk, such as the Directory Cache option.
Before reformatting your hard disk, be sure to back up all important information from the disk.
The Ram Disk cannot be formatted. If you accidentally select the Ram Disk for formatting, a requester reports that there is a format failure and requires you to select Cancel.
If you have more than one disk icon selected, more than one Format window opens when the Format Disk item is selected from the Icons menu. The format windows open one on top of another so that only one Format window is initially visible. Drag the windows until all are visible. Be sure to check the Current Information field in the Format window for the intended Device and Volume names before allowing the format to continue.
| Caution |
|---|
| Check the device and volume names carefully. If you accidentally reformat your hard disk instead of a floppy, you will eras all of your files. |